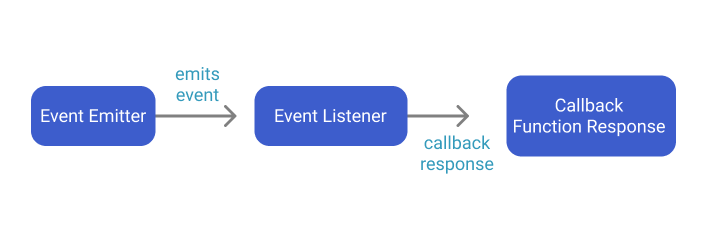
Want to know more about Events in Node.Js? Of course you do! And as Node.Js is an event-driven architecture, it's definitely a good idea to get a handle on how to use them. If you want to build an application built on this so you can create, listen and react to different kinds of events, then we've got you covered in this tech tutorial. We'll cover:
- What an event is;
- How to handle them in node.js;
- Passing arguments and handling errors in events.
There's no time like the present, so let's get started.
Introduction to Events in Node.js
So what exactly is an event? Whilst your mind may go to a fancy soirée or an evening of networking, in this instance an event is the response or result of one or more actions. This action can be either a user input or a timed output.
For example, let's assume you’re signing up on a website and you're supposed to receive an OTP after inputting your number. When you click ‘Send OTP’, an event gets triggered and the website admin is notified of the new signup. The admin will automatically react to this by sending an OTP to your phone number.
Another event response is a welcome email when you complete signup. The admin will receive several other signups/OTP requests. This is similar to the Pub/Sub model where a publisher triggers a particular event and the subscriber reacts to them.
What is an Event Emitter?
Okay, so you get what events are, but how about an event emitter? As Node.js uses an EventEmitter class that will help you handle and perform actions on an event, we thought we'd better cover it:

The EventEmitter object provides us with a list of methods such as on, once, and emit. The following are some of the most used methods you can access;
Method |
Description |
addListener(event, listener) |
Adds a listener at the end of the listeners array for the specified event. No check is made to see if the listener has already been added. |
on(event, listener) |
Adds a listener at the end of the listeners array for the specified event. It is similar to the addListener() method. |
once(event, listener) |
Adds a one-time listener to the event. The listener is invoked only when the next event fires, after which it is removed. |
removeListeners(event, listener) |
Removes a listener from the listener array for the specified event. However, it will change the array indices in the listener array behind the listener. This method will remove at most, a single instance of a listener from the listener array. |
removeAllListeners([event]) |
Removes all listeners, or the listeners in the specified event. |
emit(event, [arg1], [arg2], [...]) |
Execute each of the listeners in order with the supplied arguments. Returns true if there are listeners on the event and false otherwise. |
You can also initialise an event like this:
const events = require('events'); const myEmitter=new events(); |
And if you're thinking of adding a new emitter, then you can do this by accessing an instance of the built-in node module events. This is similar to setting up an event listener on a DOM element in client-side javascript.
After this, you'll set up listeners that contain a callback function with a response to your event. The emitter emits a named event. For example, you can set up listeners for a signup page. Let us set up an event called newUser:
myEmitter.on('newUser', ()=>{ console.log("There is a new user"); }) |
Next, use the emit method to trigger a response on the listener by running. It'll look a little something like this:
myEmitter.emit('newUser'); |
Yep, it really is as simple as it sounds! So let's find out how you can handle multiple event listeners.
Handling multiple event listeners
You can also set up multiple listeners on an event. Here, we'll be setting up the newUser event with more listeners. Take a look below:
const events = require("events"); const myEmitter = new events();
myEmitter.on("newUser", () => { console.log("There is a new user"); });
myEmitter.on("newUser", () => { console.log("UserName: Andy"); });
myEmitter.emit("newUser"); |
When you run this in your terminal, you will get the following result:
There is a new user
UserName: Andy
Passing arguments to an event
When emitting an event, you can also pass arguments into it. Let’s try and pass a name argument to the event with this code:
myEmitter.on("newUser", (name) => { console.log(`There is a new user with username ${name}`); }); |
And if you're feeling adventurous, you can even emit the event with a value of name:
myEmitter.emit("newUser", "Andy"); |
Similarly, you can pass multiple arguments into your event:
myEmitter.on("newUser", (name, idNo) => { console.log( `There is a new user with username ${name} and ID number ${idNo}` ); });
myEmitter.emit("newUser", "Andy", 1000001); |
Firing an event only once
You can also trigger an event only once using the once() method. The on() method can fire several times and this is shown with the example code. With the on() method, you get a result containing the three emitted events.
let incrementNumber= 0;
myEmitter.on("newUser", () => { console.log(++incrementNumber); });
myEmitter.emit("newUser"); myEmitter.emit("newUser"); myEmitter.emit("newUser"); |
Output with the on() method:
1
2
3
But did you know that you can trigger this event just once by using the once() method instead? Yes, just use this:
myEmitter.once("newUser", () => { console.log(++incrementNumber); }); |
Output on once() method:
1
Error handling in events
So it's all well and good emitting, passing arguments and the like, but what do you do with errors? It's inevitable for errors to occur during development, so don't beat yourself up about it. Instead, anticipate and handle all expected errors properly. Node provides you with an error handler event if an error occurs. Your EventEmitter needs to have at least one listener that emits an error event. Otherwise, if you error occurs without it, you’ll get thrown an error, and the stack will be printed and the node process will exit.
To prevent the Node program from crashing, we can add a listener for the error and use an error handler to handle and emit a response for the error. The proper convention for writing errors is to name the event error:
myEmitter.on("error", (err) => { console.error("There was an error:", err); }); |
Conclusion
Et voila! We've learned how to create, dispatch, set up multiple listeners, and handle error events in Node.JS. There are several other methods and functions you can perform with events. Some of them include removing event listeners, removing all event listeners, and setting maximum listener length. If you're interested, you can read through the Node.JS documentation to learn more about events.
Like what you've read or want more like this? Let us know! Email us here or DM us: Twitter, LinkedIn, Facebook, we'd love to hear from you.


