Whether you’ve been using Kubernetes for a while, or you’re still testing it out, it’s more than likely that you’ve come across Kubernetes events before. But what exactly are they and is there a way to manage a Kubernetes Cluster State for high availability?
What are Kubernetes Events?
Have you dealt with any debugging issues when using Kubernetes? It can be incredibly frustrating, but understanding event creation and state change can really help. Kubernetes events provide insight into what is happening inside the cluster. Event is a resource type in Kubernetes and it is automatically created due to state changes which occur in the cluster. So as you can see, events are a super valuable resource when dealing with debugging issues. Read on to learn more about the flow of state/event management and related timers and how this can help you.
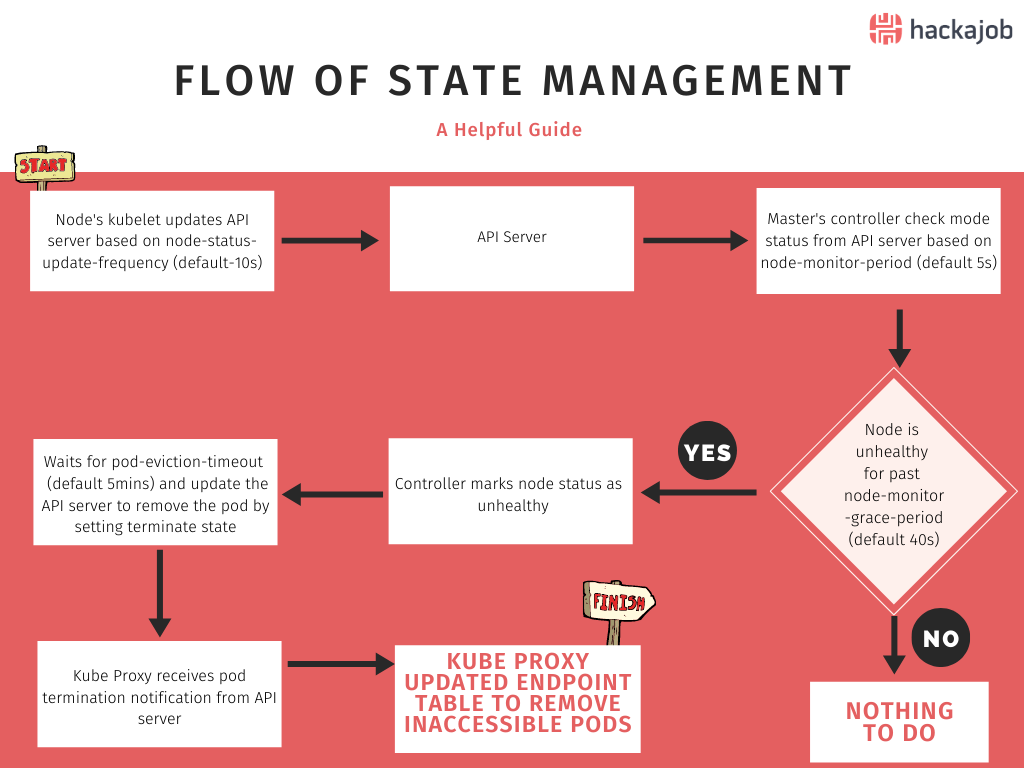
Flow of State Management
If you understand the flow of state management, it’s easy to understand how some states fail, and how we can prevent this, so let’s dig in:
- The Kubelet in each cluster node updates the API server based on the frequency configured in the node-status-update-frequency parameter. The default value is 10s.
- Then from time to time, the master’s controller manager checks the node status from the API Server. The frequency is configured in the node-monitor-period parameter and the default value is 5s.
- If the master's controller manager notices a node is unhealthy via the node-monitor-grace-period (Default is 40s), then it marks the node as unhealthy via the control manager.
- Then the controller manager waits for pod-eviction-timeout, (default is 5 mins) and updates the API server to remove the pod by setting terminate state.
- Kube proxy receives pod termination notification from the API Server.
- Kube proxy updates the endpoints by removing inaccessible pods.

What happens to the cluster when nodes fail is then, based on default timing. In this above example it will take 5 mins and 40 seconds (node-monitor-grace-period + pod-eviction-timeout) to remove inaccessible pods and get back to a steady state. This is not a problem if deployment has multiple pods (more than 1 replica) and the pods on the healthy nodes can handle all transactions without any failures. If deployment has one pod or healthy pods cannot handle the transactions, then 5 mins and 40 seconds is not an acceptable down time, so the best solution is configuring the timing variables in the cluster to react faster for failures. How do you do that, you ask? Well, let’s go through it together:
Configuration changes to improve the high availability of the cluster
The following steps were tested in Kubernetes v1.18.3
1. Reduce node-status-update-frequency
node-status-update-frequency is a kubelet configuration and the default value is 10 seconds.
Steps to override default value
a) Change the kublet configurations in all nodes (master and workers) by modifying the /var/lib/kubelet/kubeadm-flags.env file
vi /var/lib/kubelet/kubeadm-flags.env
b) Add the “--node-status-update-frequency=5s” option at the end or anywhere on this line.
KUBELET_KUBEADM_ARGS="--cgroup-driver=systemd --network-plugin=cni --pod-infra-container-image=k8s.gcr.io/pause:3.2 --node-status-update-frequency=5s"
c) Save your file.
d) Restart the kubelet.
systemctl restart kubelet
e) Repeat steps (a) to (d) in all nodes.
2. Reduce node-monitor-period and node-monitor-grace-period
node-monitor-period and node-monitor-grace-period are control manager configurations and their default values are 5 seconds and 40 seconds respectively.
Steps to override default value
a) Change the kube-controller-manager in master nodes.
vi /etc/kubernetes/manifests/kube-controller-manager.yaml
b) Add the following two parameters to the command section in kube-controller-manager.yaml file
- --node-monitor-period=3s
- --node-monitor-grace-period=20s
After adding above two parameters, your command section should look like this:
spec:
containers:
- command:
- kube-controller-manager
. . . [There are more parameters here]
- --use-service-account-credentials=true
- --node-monitor-period=3s
- --node-monitor-grace-period=20s
image: k8s.gcr.io/kube-controller-manager:v1.18.4
imagePullPolicy: IfNotPresent
c) Restart the docker
systemctl restart docker
d) Repeat the steps (a) to (c) in all master nodes.
3. Reduce pod-eviction-timeout
pod-eviction-timeout can be reduced by setting new flags on the API-Server.
Steps to override default value
a) Create a new file called kubeadm-apiserver-update.yaml in /etc/kubernetes/manifests folder in master nodes
cd /etc/kubernetes/manifests/
vi kubeadm-apiserver-update.yaml
b) Add the following content to the kubeadm-apiserver-update.yaml
apiVersion: kubeadm.k8s.io/v1beta2
kind: ClusterConfiguration
kubernetesVersion: v1.18.3
apiServer:
extraArgs:
enable-admission-plugins: DefaultTolerationSeconds
default-not-ready-toleration-seconds: "20"
default-unreachable-toleration-seconds: "20"
[NOTE] Make sure the above kubernetesVersion matches with your Kubernetes version
c) Save the file
d) Run the following command to apply the changes
kubeadm init phase control-plane apiserver --config=kubeadm-apiserver-update.yaml
e) Verify that the change has been applied by checking the kube-apiserver.yaml for default-not-ready-toleration-seconds and default-unreachable-toleration-seconds
cat /etc/kubernetes/manifests/kube-apiserver.yaml
f) Repeat the steps (a) to (e) in all master nodes.
The above steps change the pod-eviction-timeout across the cluster, but there is another way to change the pod eviction timeout. You can do this by adding tolerations to each deployment, so this will affect only the relevant deployment. To configure deployment-based pod eviction time, add the following tolerations to each deployment:
tolerations:
- key: "node.kubernetes.io/unreachable"
operator: "Exists"
effect: "NoExecute"
tolerationSeconds: 20
- key: "node.kubernetes.io/not-ready"
operator: "Exists"
effect: "NoExecute"
tolerationSeconds: 20
[NOTE] If you are working with a managed Kubernetes service, such as Amazon EKS or AKS, you will not be able to update pod eviction timeout across the cluster. You will need to add the tolerations to your deployment in each situation.
And that's it, you've successfully managed Kubernetes events. Well done! hackajob has a wealth of roles where skills like this will come in handy. Interested? Find the right opportunities here.
Like what you've read or want more like this? Let us know! Email us here or DM us: Twitter, LinkedIn, Facebook, we'd love to hear from you.


