We're back with another OAuth tech tutorial. If you're wondering what OAuth is and how it can be used be sure to check out the first part of this series here. Now we're familiar with resource owners, servers, clients and tokens, let's see how can put it into practice with these two OAuth flows: standard authorisation call flow and implicit authorisation call flow. Let's get into it!
OAuth Flows
Standard authorisation Call Flow:
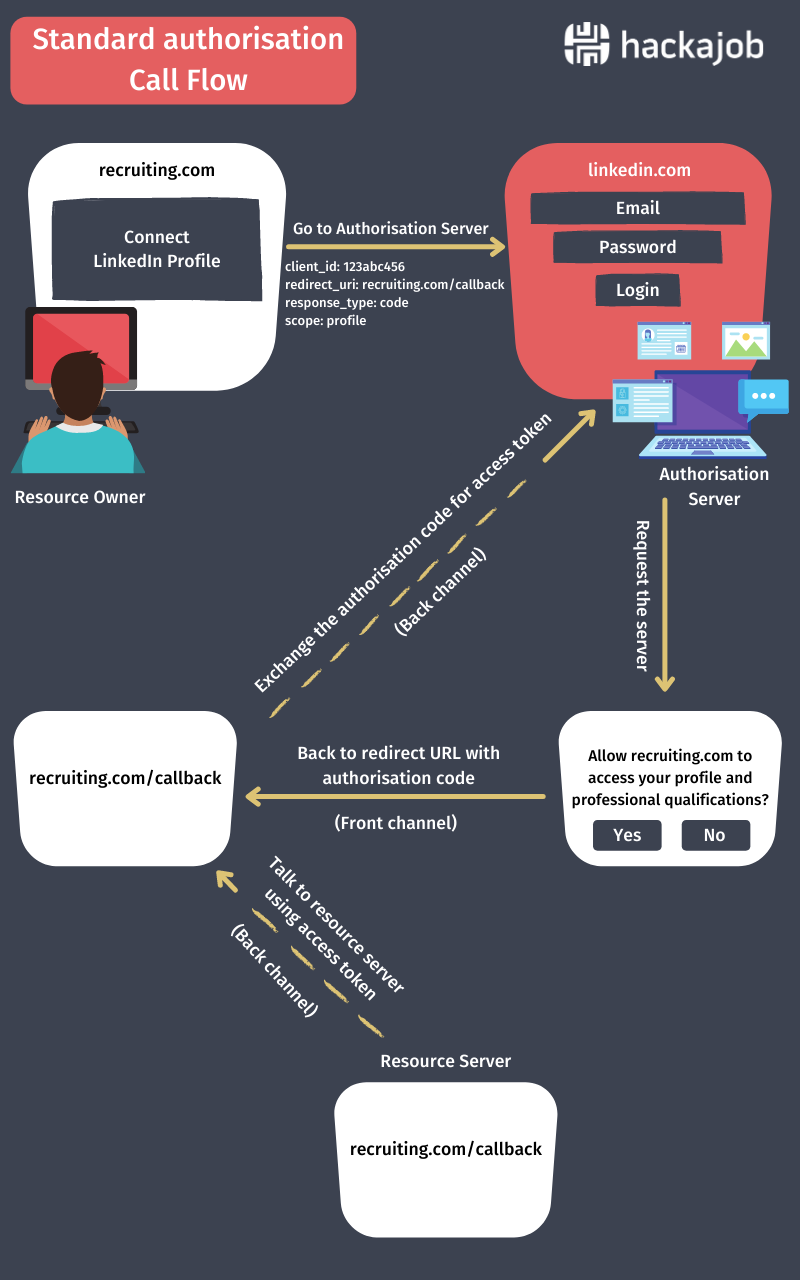
Here's an infographic to visualise how it all works. We'll show you the 'how to' and the coding needed below.

- The Resource Owner (user) logs in to the client (Recruiting System) and tells the client to access the resource in the resource server (LinkedIn).
- The Client (Recruiting System) talks to the Authorisation Server (authorisation server of LinkedIn) to get the required authorisation to access the resource.
With this request, the client sends the following details to the authorisation server.
client_id – ID of the client, this is used by the authorisation server to identify the client (recruiting system). To get the client_id, the client should be registered in the authorisation server beforehand. During this registration process the client gets two IDs: one is the client_id and the other is the client_secret. Due to security reasons the client_id is used in front channel communication (this is when the browser is involved in the communication). Client_cecret is used in back channel communication (API calls) when tokens are exchanged.
redirect_uri – This is the URI (uniform resource identifier) which the authorisation server uses to redirect the request after receiving the consent from the client.
scope – A type of permission needed by the client (There are predefined scopes in the authorisation server. There can also be multiple scopes separated by space in one request)
response_code – A type of authorisation.
State - Some identification string exchange between the client and authorisation server to identify the request (optional parameter)
If you'd like a sample URL, check this out: https://linkedin.com/login?client_id=123abc456&redirect_uri=https://recruiting.com/callback&scope=profile&response_type=code&state=abc123
3. The authorisation server talks to the resource owner to get the consent to share the resource. During this step, the authorisation server displays the client details and permissions which are requested by the client to the resource owner.
4. The resource owner gives consent to share the resource.
5. The authorisation server sends the authorisation token to the client.
If the resource owner gives the consent, request will be redirected to the given callback URL with authorisation code. A s ample URL would look like: https://recruiting.com/callback ?code=1234qazwsx111&state=abc123
If the resource owner denied the consent, request will be redirected to the given callback URL with error code and description. A s ample URL would look like: https://recruiting.com/callback?error=accoess_denied&description=usernot allowed&state=abc123
NOTE: The authorisation token is exchanged through the front channel (browser) which is less secure, and anyone can get that authorisation token, so standard OAuth call flow isn't allowed to use authorisation tokens to access the resource.
The client uses the authorisation token it received and calls back to the authorisation server to get the access token.
6. This request goes through API calls (back channel) and this is a POST request.
Sample Request:
POST https://linkedin.com/token
content-type: application/x-www-form-urlencoded
code=1234qazwsx111
client_id= 123abc456
client_secret=wsxedc2345rfv
grant_type=authroization_code
7. The authorisation server validates the authorisation token and sends back the access token.
Sample Response:
{
“access_token”: “098ujmyhn0987yhn”,
“expires_in”: 3920,
“token_type”: “Bearer”
}
NOTE: The access token is exchanged though the back channel (API Call), which is highly secure, so using the authorisation token, the client needs to request the access token to access the resource in the standard OAuth call flow.
8. The client uses the access token to contact the resource server to access the resource.
Sample URL:
GET https://linkedin.com/profile
authorisation: Bearer 098ujmyhn0987yhn
9. The resource server contacts the authorisation server and validates the access token. The access token only allows access to the the defined scopes in the 2nd step.
10. The Resource server provides the relevant resource to client.
Implicit authorisation Call Flow:
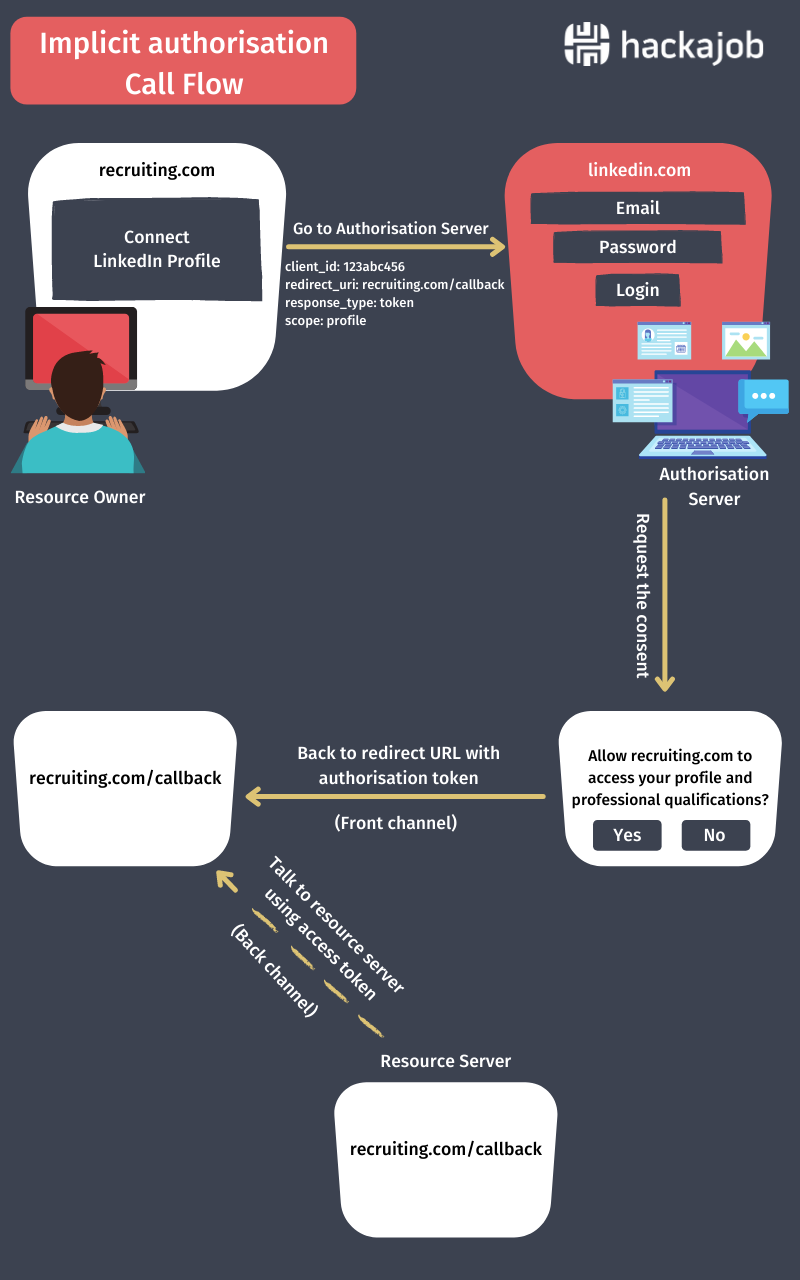
Here's an infographic to visualise how it all works with the 'how to' and the coding below. This is slightly different from the above coding, so if you're confused just refer back to these images.

In this call flow there is no authorisation code exchange as the authorisation server send the access token directly. This is less secure, and anyone can capture the access token and access the resource, as token exchange through a front channel (browser) is very secure. However, this call flow uses short-lived access tokens. Short-lived access tokens are mainly used with JavaScript or pure Angular applications where we don't have the secure exchange for access token. In this flow, response_type is the token.
Wrapping Up
We've come to the end of our OAuth series, and boy have we learnt a lot! Like how OAuth is basically designed for authorisation and not for authentication, or how a back channel is much more secure than a front channel. And if you're wondering if there's a way to improve OAuth, there certainly is: to address this limitations of OAuth, OpenID protocol has been introduced. Nowadays OpenID connect is used for authentications and OAuth2 is used for authorisations in applications. Hey, you never know we might come back with another tech tutorial around OpenID 😉.
Like what you've read or want more like this? Let us know! Email us here or DM us: Twitter, LinkedIn, Facebook, we'd love to hear from you.


